W7 review: eyeshadow, eyeliner and mascara

Hellooo again!

I think I have to let go of the idea of having a regular updating schedule, I just can’t keep up with it! I still have lots of ideas, photos and untried/unreviewed products, so I’ll keep posting, but it just won’t be regularly 😛

So. A while ago I received a package from W7, after I participated on a twitter giveaway for bloggers. I’m very glad they sent me these lovely items, and I couldn’t wait to try them!

W7_12

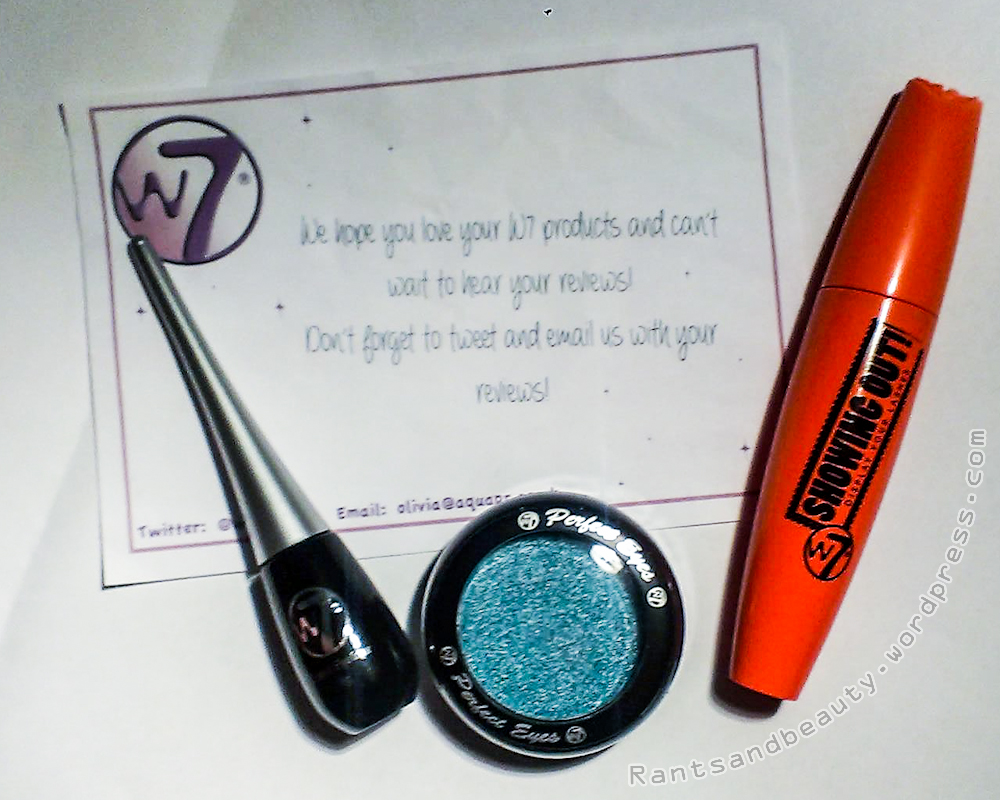
They included a small note, which I thought was totally adorable! I feel kind of guilty for not writing this review earlier, but I really didn’t have time (still don’t have really, but I just HAD to <3)

The items included in this set are:

  • Eyeshadow, Perfect Eyes in Caribbean (couldn’t find a link to the exact shade, but here are some more)
  • Liquid Eyeliner in Black
  • Mascara, Showing Out! in Blackest Black

W7_11 W7_08

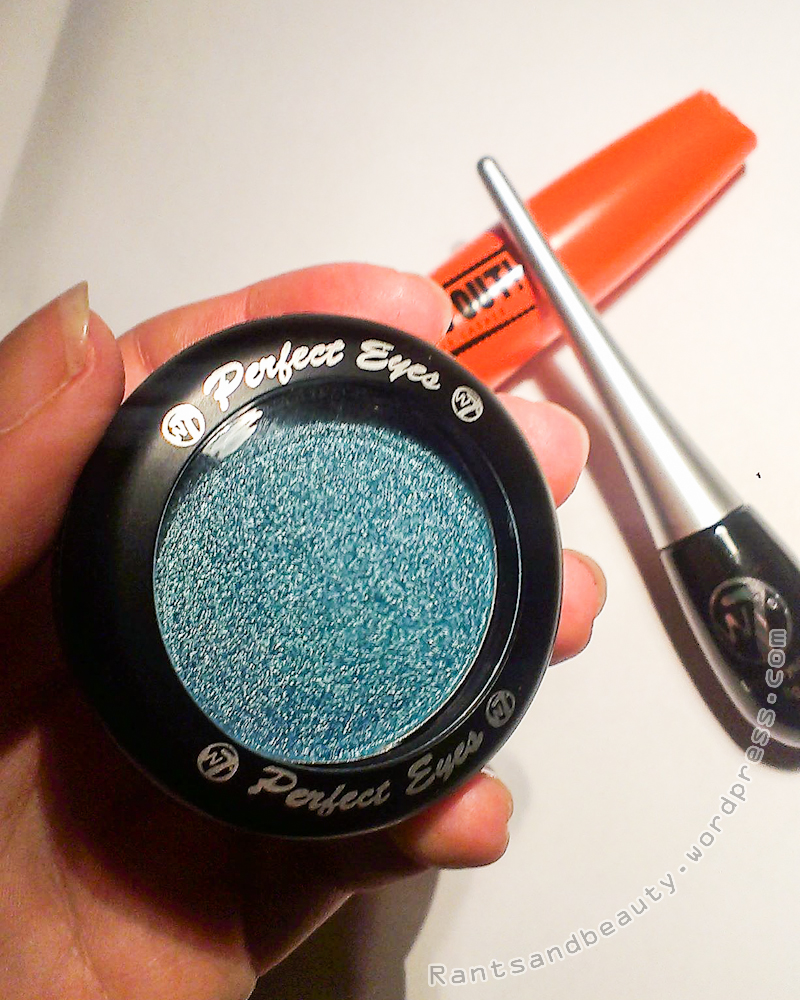
First of all, this gorgeous shimmery blue shade of eyeshadow, called Caribbean! It contains 3.5 grams of product, and the texture is very smooth. I’m already in love!

W7_07 W7_06

W7_05

And the pigment is incredible too! It lasts quite long on my (super oily) lids, even without a primer. It does crease a bit, but that’s pretty much unavoidable with my eyes.. It does have some fall-out so tap your brush before you put it on your eyelids.

W7_04 W7_09

The eyeliner has a firm felt tip, but you dip it into the pot to get the black liquid out. I haven’t actually tried it on my eyes yet, since I absolutely SUCK at making a winged eyeliner..

W7_03

But as you can see on my hand, this felt tip is GREAT at making fine lines, thick lines, squiggly lines, and is jet-black whilst doing this! I’m absolutely impressed. Especially when I tried to remove it.. this stuff doesn’t budge! I don’t have a good cleanser, but I guess an oil-based remover will take care of this.

W7_10 W7_02 W7_01

Now, onto the mascara! This is a product I use pretty much every day, so I loved getting to test this 🙂 The first thing that stands out about this mascara, is that it’s HUGE! I compared the rubber brush to my finger, and I don’t really have tiny fingers.. Wow! The brush takes up a lot of mascara, which kind of makes it difficult to apply evenly and without clumps. It is however quite easy to wipe the brush on the edge of the bottle, and this makes application much easier and smoother 🙂 Now let’s test the performance of this MOAM (Mother-of-all-mascaras)

W7_14 W7_16

W7_17 W7_20

Top is without, bottom is with mascara, without wiping the brush. I shouldn’t have applied mascara to my bottom lashes, since I was way too twitchy and smudged it all over..

W7_13 W7_15

W7_18 W7_19

Same mascara, but this time I wiped my brush on the bottle.. As you can see, this mascara gives a LOT of volume to my lashes! It also adds quite a lot of length, but I have used mascaras that gave more length. It does take a while for the mascara to dry and you have to be careful not to get clumps, but that still can be fixed with a clean spoolie brush.

All in all, I’m really glad W7 sent me these products (thanks!!), I really am impressed by the quality, since they’re not at all expensive! In the Netherlands, you can get them in some shops (Big Bazaar, Op=Op Voordeelshop) and at www.makeupmusthaves.nl 🙂

Nail Art Challenge: results and tutorial!

Hey all!

Two weeks ago I announced a Nail Art Challenge with the lovely Eva of Infinity and Tessa of TessieeBeauty, and today it’s time to announce the winner!

Here’s the line up of awesome nail arts we made.. did you guess which one was mine?

1.1IMG_0982 2 (1)10639264_10154525612280262_137770639_o (1)


It was the most right one! Eva’s is the most left one, and Tessa made the one in the middle.

We tallied up your votes, and the winner is…

Tessa! With her lovely scalloped rainbow design 🙂

Yay! Congrats 🙂

I came in a close second, and Eva got the third place

I really loved all the designs, and I loved the whole idea of the challenge! Even though time was a problem sometimes (deadlinesdeadlinesdeadlines) we still all managed to make a gorgeous nail art.

Check out Eva’s and Tessa’s tutorials, and here’s mine:

Rainbow_nail_art_01

Start by painting all of your nails an opaque coat of white, and let it dry completely (you might use a fast dry top coat to speed up the process)

Rainbow_nail_art_02


To exactly recreate the mani I made, tape your fingers in the way I illustrated above, but of course you are free to do whatever the hell you want! I used a large piece of washi tape on the moon of my thumb, and small pieces of striping tape. Then I made a criss-cross pattern on my ring finger. I decided to leave the other nails as it is, so the thumb and ring make a nice accent.

It’s also a good idea to either tape off your cuticles, or use a lip balm to protect your cuticles from the gradient we’re about to sponge on. I also have a neat little trick involving kids’ glue (Elmers’ glue) which I will post about soon 😉

Rainbow_nail_art_03


Now, the picture doesn’t exactly reflect how messy a gradient can get.. I painted 4 colours (blue, green, yellow, orange) on a sponge, and just dabbed it on my nails. I used a cheap set of rainbow colours, reviewed here. Let it dry a little, apply more polish to the sponge, and go in with a second layer (if needed; the white base colour makes the polishes pop!)

Rainbow_nail_art_04


Now, remove the tape! With the criss-cross pattern on the ring finger, make sure you remove the top piece of tape first, otherwise you’ll mess up your mani! (like I did..)

you can touch up some mistakes/uncovered areas with a small brush or toothpick and some polish in the corresponding colour.

Now, finish with a top coat to give everything a beautiful shine, and even out the gradient. Then remove all polish from your cuticles, and give them some love with a good hand/cuticle cream, and you’re all set!

So, I hope you all liked it (let me know!), and if this photoshopped-tutorial thingy is working out for you. I got the templates from http://blackcatnails.com/, check it out!

Nail Art Challenge

Welcome again! So here’s the extremely exciting post I announced Wednesday..


A lovely gal called Eva from the blog Infinity (Dutch) posted a request for people to collaborate with on a nail challenge! (see here)

Since I’m always up for a bit of a challenge, so I responded! Another girl responded too, Tessa from TessieeBeauty, and together we picked a theme: Rainbows! There were some other suggestions too, but a randomizer picked this lovely colourful theme 🙂

So, we all got to work, and all came up with a lovely nail design ❤ I really love all of them!

1.1IMG_0982 2 (1)10639264_10154525612280262_137770639_o (1)

Please vote for your favourite design over HERE; just click the one you like, and then click ‘Enquête Indienen’!

Once the voting is done, we will reveal the winner, who made which design, and how to recreate them 🙂

NOTD: Stripes and dots

Oh dear, oh dear.. I haven’t posted again in ages! I’ve got tons of deadlines and am very close to finishing my bachelor’s degree! I also already started my masters so I got too much to do and too little time to do it, while still trying to keep my sanity 😛

Anyway, I’ve got a post coming up on Friday (I already scheduled it!!), and it’s a very cool new project, which involves nails! I hope you’re as excited as I am! ❤

To keep the wait a bit more bearable, I made a nail art for you today 🙂

10565818_10154673878090262_1725571852_o 10737978_10154673877760262_794244936_o


I used two coats of Catrice’s ‘Sing: Hey Dirty-Lilac’, then with a striper brush and some old black stamping polish that got waay to thick and some polish remover I made the thick black matte stripes, and with Catrice’s ‘No Snow Petrol’ and a toothpick I made some dots on/between the lines 🙂


Let me know what you think, and stay tuned for my new post on Friday!


Maybelline Color Show Acid Wash Effect in Ripped-Tide

I apologise for the long title! The name of this little gorgeous polish is just this long..

I also usually strive to upload my post in chronological order, and never compromising on quality with ‘just getting a post out’, but I just wanted to show this little beauty to you 🙂

10578519_10154583971880262_375579301_o

I bought this bottle at bol.com for €3.99, because I had some coupons to spend (also bought nail strengthener, nail polish remover, a top coat, a brightening concealer, and a mattifying compact powder; might do some reviews on those things!) and its name is Ripped-Tide (247). It’s a cute bright blue jelly-like polish, with white ‘glitters’ in all sizes! I can distinguish 5 or 6 different sizes, with the largest glitters being about 2 millimeters in size!

10676684_10154583973485262_536787658_o10709750_10154583973270262_1054820875_o10707771_10154583973000262_1846169278_o

The blue formula is very sheer though; I needed three coats to get some kind of opacity (and it wasn’t even fully opaque), but that was fine actually. It dried quick, and isn’t as bumpy as I’d expected it to be. Even the larger glitters lie relatively flat, and are easily evened out with a top coat. The sheer formula of the polish makes for a great layered-glitters-effect, I’m really loving it! I do suggest wearing it over a white or blue  though, so the colours pop some more 🙂

I can’t really comment on the wear time, I can’t even wear it for a full day but my nails are really terrible. I used a coat of the new strengthener, and the new top coat, but still I had massive chips and could peel off large chunks of the polish. But even with a base coat, some of the glitters stuck stubbornly to my nails!

To conclude, I’m quite happy with my purchase! It has a very unique look to it, and if this bright blue isn’t really your thing, they’ve got some other shades too, including a white glitter topper!

WINNING #5: MoYou image plate

Ok, I have a few other articles I actually needed to do first, but I haven’t finished the photos for those yet, so I’m going to show you my lovely new MoYou Imageplate!

If you follow MoYou on Twitter, you might know they have regular trivia contests, where you answer a series of questions and they pick 5 winners! I answered 5 questions about famous internet cats (LOL!) and was allowed to pick one of their Kitty plates 🙂 I’m a fan of full nail images, but the Kitty plates didn’t have them unfortunately. I’m still very happy with my 04 plate though!

MoYou_Plate_Kitty (1) MoYou_Plate_Kitty (2)PI always get so excited when I get something in the mail..MoYou_Plate_Kitty (3)

..and especially if it contains such a gorgeous item! The packaging is a sleek matte card stock, with a lovely vintage-y print!
And when you slide out the image plate…

MoYou_Plate_Kitty (4)..you find a gorgeously large image plate, mounted on a thick plastic backing, with 32 cute designs!

A closer look at the designs:

MoYou_Plate_Kitty (5)Ah, don’t you just love these? After this it was time to check the stamping quality, of course! I took my trusty stamper I got from BornPrettyStore, and used a card to scrape off the polish. I used Essence’s LOL as a basecoat (the green) and stamped using a red polish (can’t remember which, but no special stamping polish), and this was the result:

MoYou_Plate_Kitty (8)I kinda need to work on my placement, but you can see how crisp all lines are! Some designs were a bit small, but that was to be expected, and I don’t really mind at all 🙂

And at only 5 pounds per plate, I think these are a great deal!

MoYou_Plate_Kitty (6)


BPS eye shadow palette review & swatches

Another apology for not making any new posts.. I’ve been super busy 😦 I barely have time to read blogs and check Facebook!!

Anyway, you won’t believe how long this article has been on my to-do-list. I ordered this palette last year (december) at BornPrettyStore! LAST YEAR. Meanwhile, it’s gone out of stock 😦 I bought it for 4 dollars back then, and you might be able to find some on eBay!

I hadn’t tried it for very long (since I wanted to take unswatched pictures of the palette) but MY GOD the pigment is incredible! Enough words, onto the photos 🙂BPS_palette (1)


The packaging is a shiny black, with a silver-coloured print on it. Doesn’t look too shabby, but it doesn’t scream luxury either. It’s nice though that you can already see the colours!

BPS_palette (2)


Even in the packaging, the colours already look very bright and shimmery.. can’t wait to open it! It did take some effort to open it, but that might be because I’m very clumsy and I was careful not to drop the palette..

BPS_palette (4)


This just made me drool in anticipation to finally be able to touch the shadows..

BPS_palette (5) BPS_palette (7)And I wasn’t let down! The shadows feel extremely creamy, slightly powdery with a bit of fall-out, but the pigment is just to die for ❤ Even the lighter colours picked up great on my skin. (also, I had to use my right arm to swatch on, which is why the pictures aren’t great. Have you tried photographing your right arm with your left hand? Yikes!)

The pans give off a LOT of eye shadow at the time, so if you’re using a brush, make sure to tap off the excess!

I wiped my finger after every swatch, and even on the paper towel the pigment is incredible..

BPS_palette (10)

Oh, there’s also this little sponge applicator, which looks really out-of-place in such a large container.. Whatever! It’s not like I’m going to use this..


I’ve been using this palette for a while now, and the pigment is as good on the eyes as it is on my arm. Lovely, rich shades, that are great for a very bold look!! I’m in love 🙂


I’m back!

Hello all!

Even though I’ve been commenting and reading sporadically over the past week, now I’m officially back from my holidays in Rome and Morocco! I will of course talk a bit about those holidays in a while, and I’m going to be back to post about beauty-stuff very soon too!

I do have to start studying again unfortunately, so I won’t be posting any more than I did before (once a week) 😦 

I did make some swatches and pictures, so I can focus on editing and writing 🙂

Also, I did really grow out my nails during the holidays! Especially on my left hand (the swatch hand, haha) the nails got really long! Unfortunately, I OBVIOUSLY broke a nail the first time I went to sports practice again. I didn’t even participate in the training! *sigh*

Anyway, expect a post pretty soon!!


ps. I WON ANOTHER GIVEAWAY! I now have a gorgeous MoYou stamping plate ❤

NOTD: Holidays!

Just a little NOTD I made on the 17th of July. I wrote this in advance because I’m going on holiday for a while, so I won’t be posting/commenting/reading anything!

This’ll probably have worn off when this comes online, and some of you might’ve seen it on twitter/instagram already, but I still wanted to share it with you 🙂

The polishes I used are (from dark to light) Rimmel Out of the Blue, Fizz (some cheap polish from the Action) and NYC’s Blue Sky. The decoration is from the gift box I won at MissPinkyNails 🙂 It’s from Essence but I don’t know the exact name.

So, are you going on a holiday, or have you been away already? Please share!

L’oreal Surprise Pack #2

As I mentioned in my previous post about a L’oreal box, I wasn’t completely satisfied with the contents: 3 lip products and one eye shadow. I sent a mail to the company, and they promised to send me some other products. When they arrived, there were, again, 4 products in the box! How great is that service? 😀

Without any further ado, here’s the lovely box:

L'oreal_test_2_01

Included in this box were:

  • Two HIP pigments, Showy (blues, 224) and Mischief (908)
  • Telescopic Explosion mascara in Blackest Black, waterproof (985, the one with the weird brush)
  • True Match Naturale Mineral-Enriched mascara, also in Blackest black (805)

L'oreal_test_2_02

I already had one of the HIP eyeshadow duos (Sassy), and I like it a lot! The colours blend well and are quite pigmented and buildable. The wear time is quite long, but on my oily lids, creasing is unavoidable.

L'oreal_test_2_04 L'oreal_test_2_03

These duos contain a matte and a shimmery shade, while the other (in the previous box) contained two metallicy shades. These also have a little sponge applicator and a mirror in a ‘secret’ compartment. Both shades were smooth to the touch and didn’t have much fallout, but it was very noticeable that the shimmery shades were more pigmented than the matte shades

L'oreal_test_2_06 L'oreal_test_2_05

The first swatch shows the colours after I build them up a bit, the second shows a one-finger-swipe-swatch. After I tried the shadows on my eyes and used a brush, the dark shades were much more intense (hello raccoon eyes :P) and looked great.

Now, onto the mascaras! I didn’t take proper pics of the second mascara, but it was nothing special. At least not compared to the Telescopic Explosion! I’ve never seen a brush like that..

L'oreal_test_2_07 L'oreal_test_2_08


The little brush head/ball is designed to precisely extend and separate the lashes, and to get into the corner of the eye and catch all lashes! I also like how the mascara tube comes separate from the brush, so everyone gets to appreciate the brush in all its glory 😀

Now, I’ve never made comparison pics before of my lashes, but I tried my best.. Left is without, right is with this mascara:

L'oreal_test_2_09 L'oreal_test_2_11

And from the side

L'oreal_test_2_10 L'oreal_test_2_12

I have quite black and long lashes myself, but this mascara gives a beautiful curl and adds some length. It promises a fanned-out effect on your lashes, and it delivers. No clumping, no lashes glued together. I love it!

The second mascara (I forgot to take separate pics.. oops) is the Bare Naturale Mineral-Enriched (quite a mouthful!), and apparently it’s a formula which contains aloe, vitamin E and jojoba oil. I don’t particularly care about the formula, so let’s move on to the lash shots! I do apologise in advance for my red eye. I got a little bit too excited with the cleanup and probably poked my eye or something.

L'oreal_test_2_13 L'oreal_test_2_19


L'oreal_test_2_14 L'oreal_test_2_20

The sun hide behind the clouds for the mascara shots, that’s why my pupils are dilated like mad!

I’m not very impressed by this mascara. It doesn’t do much for me, except from smudging under my eye, although I kind of have myself to blame for that because I’m super clumsy and pretty much smeared mascara all over my under eye area..


So, this concludes this review. I love how they sent me more products, even though I didn’t exactly ask for it! Big thumbs up for them 🙂 I was really impressed by the Telescopic Explosion mascara, and I can never have enough eye shadow!